What You Need to Know About Tiling Over Existing Tile. Are you fed up with the worn-out tiles in your kitchen or bathroom? Is it time to update your area, but you’re put off by the prospect of removing the existing tiles? The good news is that you can occasionally tile over tile without having to remove the previous tiles first! In this post, I’ll go over when tiling over existing tile is a good idea (spoiler alert: it typically isn’t) and show you how to do it step by step!
I remembered that my friend Bre from Brepurposed tiled over old tile in one of her bathrooms when we were attempting to figure out how to modernise the shower as part of Attley’s bathroom remodel on a budget. I was confident it could be done well because her father-in-law is a tile expert. But because Bre didn’t tile over tile in her shower, I wasn’t sure if the same procedure would work for us. So I conducted a lot of research and will share what I discovered in this post.
Is it possible to tile over tile?
Yes, you can tile over pre-existing tiles. We did it and are really pleased with the outcomes (more on our project later). However, it is not always a practical or wise alternative. You should only consider tiling over existing tile if the following conditions exist:
- Your current tiles are securely fastened to the underlying surface. Tap your existing tiles carefully with a mallet to ensure they are securely glued. Any that make a hollow sound are loose and should not be tiled over.
- Your current tiles are level. Check for any imbalances using a level. I would not tile over existing tile if your level can rock even slightly.
- Your tiles are not fractured, loose, or in any way unstable.
- You are not aware of any current or previous leaks.
- You are certain that there is no dampness behind your present tiles. I strongly advise you to use a moisture metre to check.
- You have proven that tiling over existing tile is doable; however, keep in mind that an additional layer of tiles may boost the height of the floor or wall, which may necessitate adjustments to doors, trim and other room components.
And, like with any DIY project, you must ensure that you have the necessary materials, tools, and skills. Otherwise, you should get expert assistance!
Is it a good idea to tile over tile? Should you go ahead with it?
Now that you know you can tile over old tile, the question is whether you should. Personally, I believe the answer is usually no because the old tile surface is rarely suitable for tiling over.
Tiling over tile is only a possibility if your project fits all of the aforementioned criteria. It may be tempting to tile over tile that does not fulfil all of those requirements in the belief that it is a decent “quick fix” for getting your house on the market, etc. However, tiling over tile that is fractured, unstable, or has a leak or moisture problem is a bad choice.
However, if your tile is in excellent shape and has no flaws, tiling over it can be an excellent method to update and modernise a bathroom without the price and difficulty of removing the current tiles. I believe that tile over tile is an excellent choice for tile backsplashes, fireplace surrounds and bathroom walls.
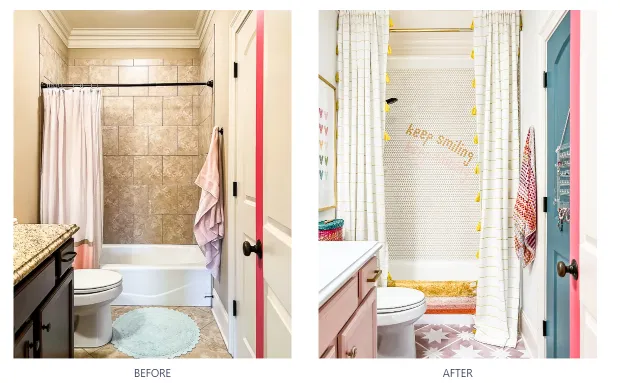
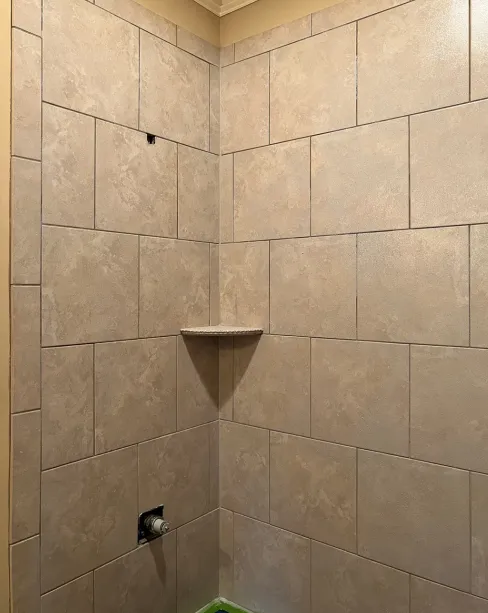
We put tile over tile on the walls of our daughter’s tub/shower combo nearly two years ago and are quite pleased with the results. But I would never consider doing it in our main bathroom because the tiles aren’t completely level.
I would not lay floor tile over existing tile since the extra thickness would result in a difficult threshold transition from the adjoining room. Note: In our laundry room, we built a floating vinyl tile floor over a ceramic tile floor, and the extra thickness was easily managed with a threshold where the tile floor met our hardwoods. And there are plenty more inexpensive flooring alternatives for replacing tile floors that I would consider first. For example, in both of our daughters’ bathrooms, we used tile stickers to refresh the tile floors!
What are the disadvantages of tiling over tile?
While tiling over existing tiles is a cost-effective and quick option to renovate a room, there are some limitations to consider.
If your existing tiles are not securely bonded to the underlying surface, or if the existing tile surface is not properly prepped before installing the new tile, the new tiles may not adhere properly and will eventually loosen and/or crack. If you chose to remove the tiles and start over, you will have to demo two layers of tile.
The additional layer of tiles will increase the thickness of the floor or wall, which may necessitate changes to doors, trim, and other room features.
Our Project and Its Outcomes
We tiled over the shower tiles in our daughter’s bathroom and are overjoyed with the outcome. We finished our tiling project on November 21, 2021, and I’m writing this on July 13, 2023. Everything is holding up great, and we have had no problems.
I waited a long time to compose this piece since I needed some time to pass! I’d feel terrible if I posted the piece and the tiles slipped off 6 months later. But now that we’ve had so much time, I’m confident in our outcomes!
Materials Required
If you decide to go forward with it, you will need some specific goods in addition to the standard tile installation tools (mortar or thinset, trowel, grout, and so on). This is due to the fact that a smooth surface is not suitable for tile adhesion.
- ECO Prim Grip is a Bond-Promoting Primer with Multiple Applications. It is designed to aid mortar adhesion to existing ceramics and difficult-to-bond-to substrates.
- A painter’s tray, a roller, and a paint brush that you don’t mind discarding after use.
- Gloves made of latex
You will also require something to complete the edge of your tile installation where it meets another surface. This is a little tough because your tile will be twice as thick as usual. If you are putting tile over an existing tile floor, you will need to choose a transitional threshold.
If you are tiling over an existing tile wall, you will need an edge trim that is the thickness of your old tile + 1/8′′ for mortar + the thickness of your new tile. The 1/2′′ size was ideal for us, however because tile thickness varies, you may want a different size.
A Step-by-Step Guide to Tile Over Tile
Because that is what we did, this tutorial will show you how to tile over existing tile on shower/tub walls.
We followed this tutorial from a highly reputed contractor in general. However, we did not use a waterproof membrane as he proposes in the video. Why? According to our findings, the barrier may inhibit the bonding primer from performing its function. In his video, he explains that the membrane will separate any moisture that is under your existing tiles from your new tiles. We did not use a waterproofing membrane because we were confident there was no moisture behind our old tiles (again, use a moisture metre to confirm). For what it’s worth, if we had found any moisture, we would have pulled up the old tiles instead of tiling over them.
1. Prepare the work area.
We started by cleaning our tiles with T.S.P. Then we used plastic sheeting and a plastic tarp to cover our bathtub.
2. Apply the bonding primer to the existing tile.
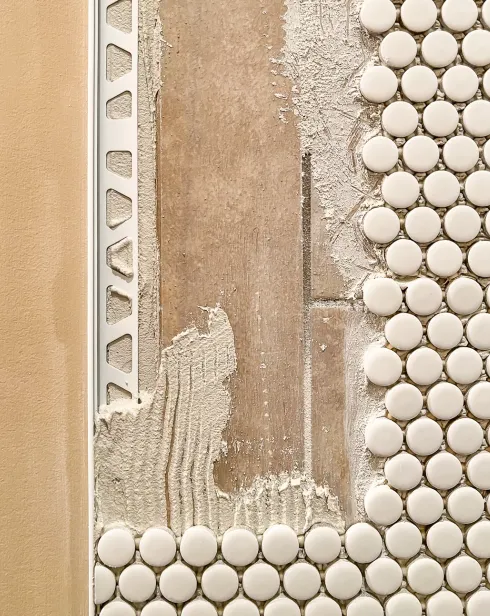
Apply the ECO Prim Grip to the tile surface. Use a paintbrush to reach regions where the roller cannot. This product is quite fluid, so cover any areas you don’t want it to touch. Allow it to dry. It is worth noting that it is pretty translucent–it simply adds a greyish haze to your tiles (see photo below). That doesn’t imply you haven’t put on enough! When you run your fingers over it once it has dried, you will notice how gritty it is. That grit will help the mortar and new tiles adhere well and support the extra weight.
3. Measure and install your edge trim.
In most cases, you should install your tile edge trim first, followed by your tile, by setting the edge of your tile against the edge trim and working away from it into the corner. This is something I would recommend if you are putting tiles with straight edges.
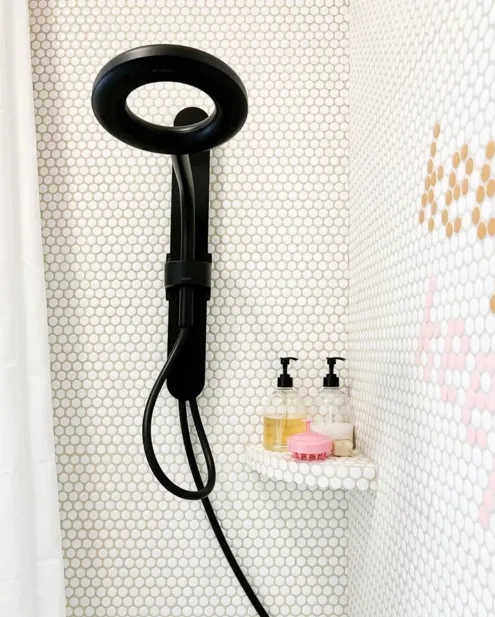
We chose to work in the opposite direction since we were putting round penny tiles and needed them to match up in the corners in a specific way. Because we worked from the corner to the tile edge trim, we did not install the edge trim until we were ready to tile up to it. It was perfectly OK to do it in this sequence, but if we had used straight-edge tiles, we would have worked in the opposite direction.
Read: How to Refinish and Maintain Butcher Block Countertops
4. Put down your tile and grout.
I won’t go into detail because this isn’t meant to be a complete tiling instruction. At this stage, all that remains is to put your tile and grout as usual.
5. Caulk as necessary.
After you’ve finished tiling and grouting, caulk along any seams and joints that need it. If you need help, check out my tutorial on how to caulk a bathtub. For a neat finish, we also caulked where the Schluter edge trim met the wall.
That’s all there is to it! If tiling over tile is an option for you, it’s an excellent method to update your space without having to remove existing tiles. I hope this step-by-step guide has been helpful in teaching you how to decide whether to tile over existing tile and how to finish the project!
Previous Article: How to Refinish and Maintain Butcher Block Countertops
Related article: The Ultimate Home Improvement and Repair Guide for a Perfect Home
Recommended reading: Essential Home Improvement Hammers for Enhancing Your DIY Projects
Recommended reading: Home Improvement Loans vs. HELOCs: Which Option is Right for You?
More insights: Your Guide to Top Home Improvement Apps for Easy Upgrades
Related posts:


18 Living Room Fall Decoration Ideas for a comfortable, pleasant, and relaxing escape

What is the most durable material for a kitchen countertop? Experts advice best investment

Mistakes in Living Room Furniture Arrangement: 7 strategies to prevent poor layouts in the main room

Ideas for living room dividers: 9 inventive ways to partition your living room